

Spoil Yourself
The C6 is a triumph of automotive engineering and style. The factory design boy’s did a fantastic job in making the C6 a true work of rolling art. That being said there is no reason we cannot improve on things just a bit. We decided to start our exterior design improvement project on our victory red 09 ZO6. The Z has been serving as our latest project car and we thought it would make a good test bed for some exterior body mods.
The one place that any C6 needs some help with is at the rear end. Specifically the stubby little protrusion that pretends to be a spoiler. What was GM thinking? GM does have a remedy for this design error. They offer what is known as the “full width racing spoiler”. The spoiler was part of a dealer installed option on the Ron Fellows edition ZO6.
The following is a list of GM part numbers that can be used to order the spoiler:
19172807 – Prime
19172808 – Victory Red
19172809 – Velocity Yellow
19172810 – Machine Silver
19172811 – Black
19172812 – Jetstream Blue
19172813 – Crystal Red
19211167 – Atomic Orange
19211165 – Switchblade Silver
19211166 – Cyber Gray
19212626 – Torch Red
20921725 – Inferno Orange
20921726 – Supersonic Blue
One of the best sources that we have found for quality OEM GM parts is GM Partshouse located in Boyertown PA. Gene Cully the founder of GM Parts House can often be found giving technical advice on many of the Corvette Forums. He is part of a great team that ensures that you will get the correct part at the lowest price. Stock parts usually ship out the same day they get your order. You can find them at www.gmpartshouse.com or phone them at 484-949-2099.
OK, enough of the small talk lets get down to the nitty gritty of installing one of these babies. The spoiler arrived about three days after we ordered it, talk about fast. It was housed in two bullet proof boxes and wrapped in a fabric sock that ensured it would survive the cross country trip. The package included installation instructions, mounting hardware and a cut out template that is used for marking the four spots on the rear fascia that needed to be drilled.
Drilled! "What are you crazy drilling holes into an eighty thousand dollar car"? That’s one of the comments we got from one of the disbelievers in the back office. We did toy with the idea of using 3M double sided tape to install the spoiler. The stuff usually holds very well under a variety of conditions. Another plus in using tape is that you are not married to the item being taped down.
The problem in this type of installation is that there is not really enough bearing surface between the spoiler and the top of the rear fascia under the spoiler. If you want to do a tape installation you will have to install several layers of tape under the stud mounting surfaces and at the ends of the spoiler. If you use too much tape there will be a gap, if you use too little tape the spoiler may separate from the body after being exposed to the elements. After some serious debating between the drilling and taping teams we decided to “drill baby drill”.
The first step in the installation is removing the taillights. Using a ratchet and a T-15 torx socket the lights pop right out.


Here is a picture we thought you might find interesting, it's a shot of the interior of the rear fascia.

After removing the tail light reach into one of the tail light openings and feel the mounting studs that retain the stock spoiler. If you don’t have gorilla hands you will need a 10mm socket to loosen and remove them. One word of caution, do not drop the studs into the rear assembly as you will never see them again if you do.
After removing the four mounting studs lift the stock spoiler and disconnect the electrical weather pack.

The next step involves removing the studs and light from the stock spoiler. Take the stock spoiler to your work bench and remove the studs. We used pliers but realized after the fact that a 4mm socket will fit right over the top of the stud and is a much easier way to go.

Remove the light assembly from the spoiler

After removing the mounting studs install the supplied tinnerman clips and small mounting studs on the four outermost locations on the new spoiler.

The next step involves installing the tail light into the new spoiler. Place the new spoiler on a flat surface making sure you protect it. Lay it on top of the box it came in to prevent scratching. Place the light assembly into the opening and secure it to the new spoiler with two screws that are supplied with the installation kit.

This is where reading the instructions really come in handy. The know it alls in the shop never read the installation instructions. In this case they installed the two stock mounting studs to secure the light to the new spoiler. All went well until it came time to place the new spoiler on the rear fascia. Guess what, it wouldn’t fit. The stock mounting studs when used to secure the light will not allow for a flush spoiler to body fit.
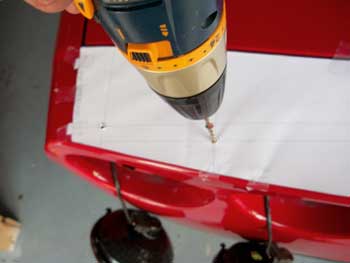
After properly installing the light in the spoiler cut out the paper mounting template that was supplied. Place the cut out template on the rear fascia and align the center mark as shown in the instructions. Make sure you line up the edge of the template with the edge of the body panel.


Now for the fun part. After double checking that the template is properly aligned with the fascia edge and the center of the electrical connector opening you are ready to drill some holes. Once you have summoned up the courage put a 1/8” bit in your electric drill and locate the drilling points on the template. Place the drill squarely on the template mark and go for it. The fascia material is very soft and the drill will penetrate it almost instantaneously. Repeat this agonizing step for that other three marked locations. These are just pilot holes as you will have to re chuck the drill with a 7mm bit for the final holes. Using the larger drill bit enlarge the pilot holes. You can now remove the paper template.
Now for more fun. The instructions call for an enlargement of the electrical connector hole. This is necessary in order to allow the weather pack connector to properly seat with the light connector in the new spoiler. We used a dremel tool with a cutting wheel attachment to trim the material off the fascia. As mentioned the fascia material is very soft and you could probably cut it with a very sharp knife with a serrated blade. Trim off about a Ľ “of material and the horror is behind you.

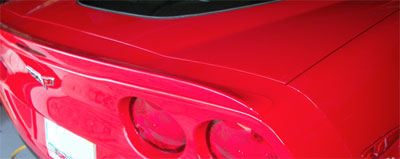
Remove the backing from the preinstalled double sided tape on the middle and ends of the spoiler. Align the studs in new spoiler with the holes on the top of the fascia. Lower the spoiler and reconnect the electrical weatherpac connector to the light assembly. After the spoiler is flush with the fascia reach into the taillight openings and fasten the spoiler to the mounting studs.
Stand back and admire the new look of your Corvette.
The Vette Nuts